Original Link: https://www.anandtech.com/show/552
 It
is a common syndrome for computer users to always crave more. No matter what
comes out or how powerful it is, one of the first things that many people do
is push the item to its limits in any way possible. You may be satisfied with
a new CPU for a few weeks or even a month, but before too long the huge speed
initially associated with a new component has all but disappeared. No longer
do you focus on how long it took your old computer to load Microsoft Word in
comparison to your new one, but rather you notice the amount of time that the
upgraded system takes to load the same program. The only way to revive that
upgraded feeling, short of upgrading again, is to squeeze every bit of power
possible out of the existing system. In addition, there are also a growing number
of people who simply want the fastest from the start. Rather than wait for the
new component wonder to ware off, these users tweak the component to the highest
degree from the start, ensuring that their system is the fastest possible. In
the vast majority of cases, both types of users employ the same method to achieve
the high speed goal: overclocking.
With rapidly changing technology and component speeds that increase in a manner that seems exponential, it has become commonplace to overclock. Many overclocking options are now set and modified via a simple Windows program, extending the art of overclocking from hard-core computer users to the average computer owner. One result of this is that now products are expected to overclock. Long gone are the days where a 6 MHz processor would not budge from its default speed setting. Recent times have seen MHz speeds increase greatly and manufacturers spec products more conservatively, two additional aspects that allowed overclocking to be a fun hobby for the average user.
Of the most commonly overclocked components, the video card is the one component that seems to be getting the most attention recently. Sure, people have been pushing the limits of their CPU for years by overclocking, but video card overclocking is an art that just recently came into play. This can be attributed to the popularity of 3D gaming: the rise of the 3D graphics card resulted in a large reliance on the video card to do more than just show 2D text. The video card is playing a more and more important role in the modern computer, making overclocking an even more attractive option. Similar to the way that a CPU is overclocked, overclocking a video card takes a bit of skill, a bit of luck, and a lot of knowledge. Unlike overclocking a CPU, each video processor responds to overclocking in very different manners. In this guide, we attempt to aid you, the reader and overclocker, on your quest to squeeze the maximum amount of speed from the most recent arrival to the video card market: the NVIDIA GeForce 2 GTS.
The GeForce 2 GTS GPU
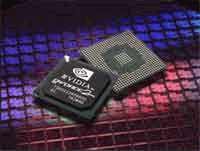
The GeForce 2 GTS, announced April 26th and available in cards very shortly thereafter, is essentially the GeForce 256 GPU produced on a .18 micron die with increased speeds and additional features (for more information, see our NVIDIA GeForce 2 GTS reivew). There is no question that the new GPU offers speed increases over the GeForce 256, but where does this speed come from. Well, the majority of speed increases that we see in the GeForce 2 GTS come from the increased clock speed and the enhanced texture pipeline.
By shrinking the architecture of the GeForce GPU down from .22 micron to .18 micron, NVIDIA was not only able to shrink the amount of silicon used in the GPU, but also to increase the speed at which these transistors operate at. Shrinking the GeForce 2 GTS GPU by using a 0.18 micron fabrication process resulted in a chip that runs significantly cooler than the .22 micron version. The reason for this is simple: by decreasing the size of the transistors in the chip, voltage, current, and thus power were also decreased. By decreasing these elements, heat associated with the items are also decreased. As we all know, heat is the enemy because it decreases the operational range of the transistors inside a processor. For example, if we have a .5 micron chip that dissipates lots of heat, the heat will render the transistors inside the chip useless because they simply can not operate at such a high temperature. By reducing the architecture of the GeForce 2 GTS GPU to .18 micron, NVIDIA has essentially eliminated harmful heat from the problem because at the stock speed of 200 MHz the processor does not produce enough heat to hinder the performance of the GPU. The MHz of the core clock is what determines theoretical fill rate, as the card would go x amount fast if it had nothing limiting its performance, which we find out is not the case in the next section.
The second item that increases the performance of the GeForce 2 GTS GPU over that of the originally GeForce 256 is the texture pipeline that the GeForce 2 GTS employs. Both GPUs contain a four pipeline rendering engine, however the GeForce 2 GTS improves upon the original GeForce 256 by processing two textures per pipeline in a single clock. The GeForce 256 could only process one texture per clock in each of its four pipes. This results in the second aspect of the GeForce 2 GTS's power: while the GeForce 256 can only process four textures per clock, the GeForce 2 GTS can processor eight textures in a single clock tick. This results in the GeForce 2 GTS being able to have twice the rendering power of the GeForce 256 at the same clock speed.
Both of the new aspects that significantly increase speed in the GeForce 2 GTS also significantly alter its overclocking nature. Besides increasing the raw speed of the card, these features also produce a new challenge for overclocking.
The Memory Clock
 Also
benefiting from an increase in clock speed over the GeForce 256 is the memory
pipeline. The DDR GeForce 256 shipped with a 150 MHz DDR memory clock, meaning
that for each clock cycle the DDR RAM can be written to twice, on both the rising
and falling edges of the clock cycle. This 150 MHz DDR memory clock resulted
in a 300 MHz effective memory pipeline (150 MHz x 2 writes per clock = 300 MHz).
Although fast, this 150 MHz DDR speed was still way below the speed for which
the 6 ns Infineon DDR SGRAM chips were rated at (6 ns = 166 MHz). This issue
was fixed with the GeForce 2 GTS which ships with a 333 MHz effective memory
clock (166 MHz DDR) however it still uses the same 6 ns Infineon DDR SGRAM chips.
It remains unknown why the same chip would come shipped at 150 MHz DDR in the
GeForce 256 and 166 MHz DDR in the case of the GeForce 2 GTS, however it is
most likely a limitation imposed by NVIDIA to further separate the 2 product lines.
Why is a fast memory clock important? The answer is simpler than it may seem, given a proper explanation. See, the on card memory serves for a place to store information processed by the GPU. The RAM holds frame information until the whole frame is rendered by the GPU and then spits the image out to the monitor. In addition, the on card RAM stores textures that the scene needs to fill in order to complete. The problem facing this method of frame developing is that the video card is only as fast as its slowest part. Although the GPU may be able to spit out data at a rate of x bytes per second, if the data can only get to and from the memory at y bytes per second and y is slower than x then the GPU must 'slow' itself down to accommodate the rate of y bytes per second. If it did not do so then the GPU would be piling information on top of itself and overwhelm the memory bus. The reverse is also true: if the GPU needs data from the RAM then it must travel the slow path to get there.
At low resolutions and colors, this is not a problem. Since a marginal amount of information must travel from the GPU to the memory and vice versa, the memory clock speed allows for plenty of data to be passed. When the resolution is cranked up and the colors turned to 32-bit, the amount of data that must pass to and from the memory increases, creating a bottleneck if the memory can not travel as fast as the GPU. 32-bit color alone doubles the amount of memory bandwidth needed to render a scene. Thus, by increasing the memory clock speed NVIDIA has decreased the bottleneck this system will cause, allowing for major speed increases at high colors and resolutions. This bottleneck produces what is referred to as the effective fill rate because the memory clock is limiting how fast the the GPU can actually go.
Once again, the increased importance of the memory clock due to the increased speed of the GPU plays an important role when considering overclocking.
Overclocking a Video Card
Now that we understand the two key aspects involved in the NVIDIA GeForce 2 GTS video card, we can use this information to describe the general video card overclocking procedure. As we have seen, the GeForce 2 GTS has two factors that dictate its speed: the core clock and the memory clock. Well, it is no surprise that every video card also has these two aspects that are easily changeable for increases in speed. NVIDIA did not redesign the wheel, just made it faster. Therefore, the procedure that has been taught when overclocking a video card is the same as it was since the introduction of the first video card tweaking utility.
 Common
wisdom has taught us that there is one goal to overclocking a video card: find
the highest core and memory speed combination that a card will handle while
remaining stable, and overclock the card to this amount. For the vast majority
of video cards we have seen that heat is the largest limiting factor in maximum
core clock speed. When the GeForce 256 was overclocked from its stock core speed
of 120 MHz to 160 MHz, the cards usually began to fail around this speed simply
because the chip was getting too hot. This is the reason that extreme cooling
measures, such as those employed on the Leadtek
WinFast GeForce DDR Revision B prove to be so effective. When the GeForce
256 GPU was overclocked higher than this amount, we began to see image issues
associated with chip heat. A common example of such an issue is a blocky flickering
on the rendered scene followed by a system crash. When such artifacts are seen,
beware of heat damage to the chip. Below we show a screen shot of a common place
we normally see these artifacts when in Quake III Arena, the player's face rendered
in the bottom middle of the screen. It is hard to see the triangular area on
the right side of the face that has been rendered improperly, but careful examination
will reveal the flaw. While it may seem trivial in in this screen shot, the problem
is greatly magnified when 60 FPS of this picture are being molested by the overly
fast core speed. A properly rendered face is shown to the left with a green
background. The blocky image lies to the right and is in black.
 |
|
|
|
A
properly rendered face.
|
A face with image problems on the right side due to excessive core speed. Note the blocky triangle. |
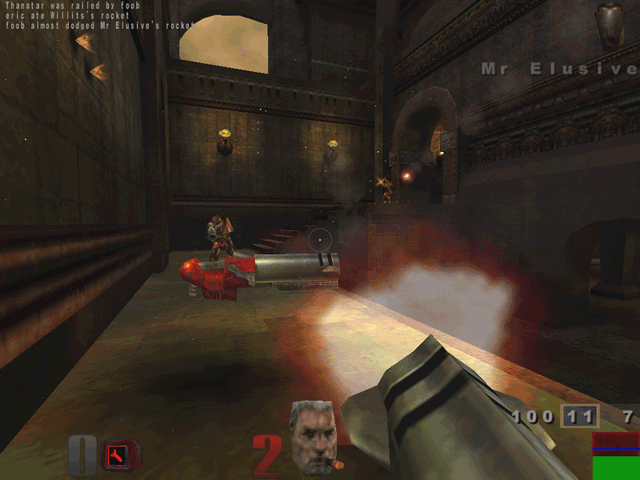
Maximum memory clock speed, on the other hand, is usually attributed to transistor conductivity, an aspect that is a function of the ratio between the transistor length and width. Rather than being plagued by heat problems, memory chips usually hit a point where the transistors inside the chip can no longer operate at such a high frequency. The fabrication process of chips results in variations in both transistor length and width, thus the maximum overclocked speed is a function of this process. The problem is that neither the manufacturers nor the consumer can tell which chips have maximum transistor conductivity. Some chips may be of the highest 'quality' and are able to reach speeds well over those speced. Other chips may not be able to operate much above the speed that they are speced for. The speced speed usually is denoted by the minimum speed that the chip will be able to operate at. When the RAM chips are pushed beyond the limit by overclocking the memory clock, the image being rendered often has small flakes in it or improper colors (yes, we have even seen Quake 3 levels in rainbow colors) and crashes are not unlikely. Image quality problems such as these are most often attributed to excess memory clock speed and are easily repaired by clocking down the memory clock. Below is a Quake 3 Arena scene that has image artifacts due to excessive memory speed. Note the snow-like effects. While the bad pixels on the screen may not seem overwhelming, when the game is being played at 60 FPS and these dots are constantly changing position, it looks like snow is falling. The artifacts may be hard to see in the small version below, but enlarging the image will reveal the problem of an overly high memory clock.
The transistor conductivity problems are also present in the processor core itself. When heat does not play a role, the transistor conductivity (often referred to as chip "quality") takes over. Processor production produces variations in transistor length and width in the same way that memory production varies these two. When transistor conductivity (chip "quality") is not favorable in the GPU, similar symptoms to heat failure are observed. The only difference in this case is that the card is much more likely to crash without any warnings or artifacts.
Due to the variations in transistor conductivity, for the most part, each video card processor and memory will overclock differently. There is no way to ensure that a particular card will go x amount above its default speed, however some speed increases have become almost common place (for example at least 10 MHz on the core of the GeForce 256). Therefore, let it be stated that your individual results may vary. In addition, overclocking has the potential to damage either the memory or the video processor (depending on which component is overclocked too high). Things to watch out for are the artifacts mentioned above, as these are sure signs that you need to slow down. Some panic when even a small speck appears on the screen. Do not fret, simply exit the program, reboot the machine and try again. Do not worry if the screen becomes filled with artifacts or the computer crashes: odds are very good that no permanent damage has been done to the card. Trust us, we have pushed cards to the limit and back and we have yet to kill a GeForce 256 or GeForce 2 GTS based card by overclocking it too much. Even if the memory or processor is not harmed while finding what overclocked setting is best for you, running at overclocked speeds has been known to reduce the life of the card because, when overclocked, transistors die at a faster rate than when not being pushed.
With these items off our chest, we can now show you how to overclock the new GPU which you just bought, the GeForce 2 GTS.
Overclocking the GeForce 2 GTS
So you are interested in getting the most out of your new powerhouse. There is no question that the GeForce 2 GTS is the most powerful 3D video card processor out there currently, however for $350 you would like to get the most out of your investment. Perhaps you grown used to the speed produced by the GeForce 2 GTS or maybe you are just looking to have the fastest system on the block. Well, the only way to ensure these things and gain the wanted speed is to overclock your new toy.
Your first instinct may
be to go out and overclock your card as much as possible. In order to do this,
however, you will need a program that allows for core and memory clock settings
to be adjusted. Luckily, NVIDIA had included such a utility in their driver
set, however it is not enabled by default. To gain access to core and memory
overclocking utilities, simply run Window's registry editor (regedit) and perform
the following steps:
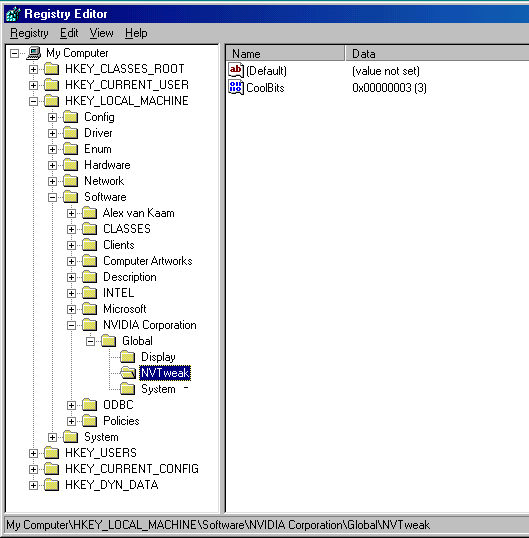
1. Open the key, [HKEY_LOCAL_MACHINE\Software\NVIDIA Corporation\Global\] by
navigating down to it in the left hand pane.
2. Add a new key named "NVTweak".
3. Go under this new key and add a new DWORD value with the name "CoolBits".
4. Double click on CoolBits in the right hand pane and set the value to 3 with
a hexadecimal base.
5. Reboot.
A screen shot of what your registry should look like is given below.
After performing these steps, an overclocking screen will be available under the additional properties of your video card. First you must enable overclocking by clicking on the "enable" check box. After a reboot, you should be up and ready to overclock. Before enabling the core and memory speeds you select, the utility will "test" the configuration. What it does during this process is beyond us, as we have yet to seen any speeds "fail" this test, however you can not use the new settings until they are tested. It is best to check the box which enables the new settings to be applied at startup as the program seems to work best if the computer is rebooted between each overclock. Below is a screen shot of exactly what this utility looks like.
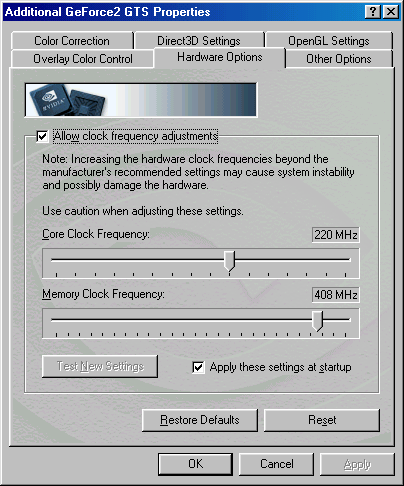
By following the above steps, you are now ready to dive into the wonderful world of overclocking your GeForce 2 GTS. But one question remains: where to begin and what to do. Should one just choose random settings and go from there? To answer these questions, we must turn to the results of our overclocking experiment and see how to approach overclocking the GeForce 2 GTS.
The Test
|
|
Windows
98 SE Test System
|
|
|
Hardware
|
|
CPU(s) |
Intel
Pentium III 733E |
| Motherboard(s) |
AOPEN
AXC6-L
|
| Memory |
128 MB SAMSUNG 800 MHz RDRAM chips |
| Hard Drive |
Western Digital Cavaiar 205AA 20.5 GB UDMA 66 |
| CDROM |
Acer 24x |
| Video Card(s) |
NVIDIA GeForce 2 GTS Reference Design Card |
|
|
Software
|
|
Operating System |
Windows 98 SE |
| Video Drivers |
|
|
|
Benchmarking Applications
|
| Gaming |
idSoftware Quake III Arena demo001.dm3 |
Overclocking: The Core
We already know that the GeForce 2 GTS GPU is fast, but how fast can we make it? To find the answer to this we tested both Quake III Arena demo001 under normal settings. By raising the core speed in increments of 5 MHz while maintaining the stock memory speed, we were able to observe what effect overclocking the core has upon the GeForce 2 GTS. Let's take a look at the results
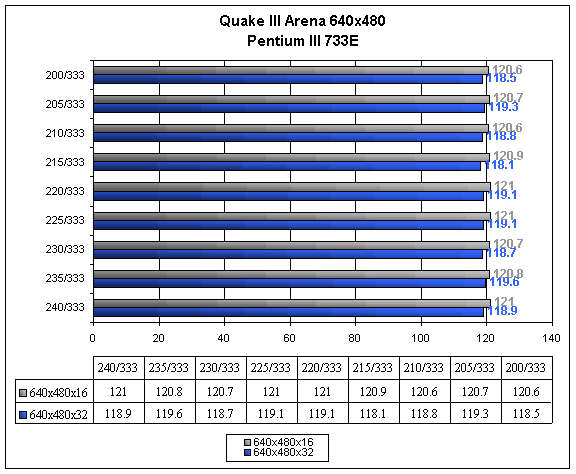
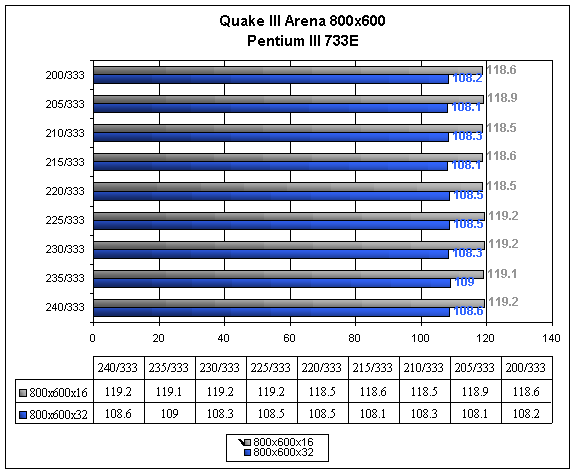
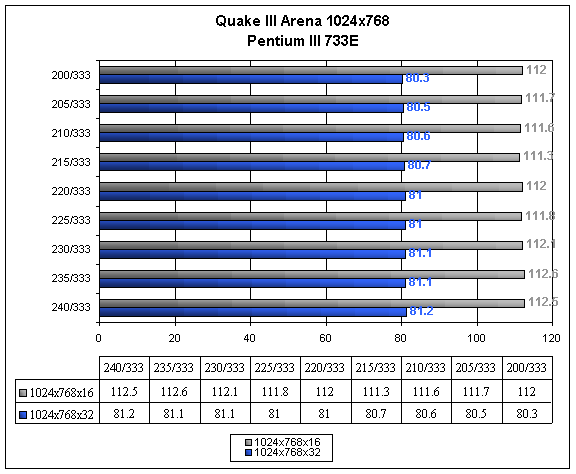
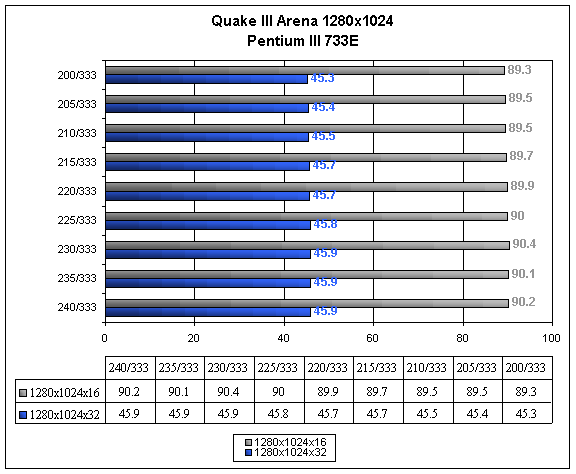
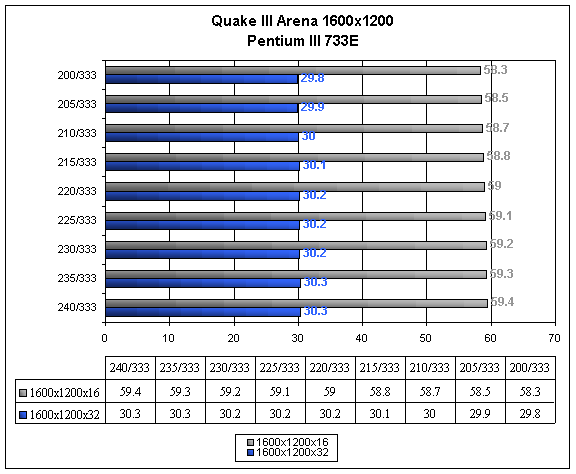
If the results look surprising, they should. It seems that even when we overclock the GeForce 2 GTS GPU to the maximum speed it will go before loosing stability, 240 MHz, that the speed increases are nominal, at best. At resolutions below 1024x768x32, the numbers fluctuate so much that they are essentially the same. Even when at 1024x768x32 and above, we find that the speed increase are not around 3 FPS like we found for every 5 MHz core speed increase in the GeForce 256. In fact, the speed increases associated with a 5 MHz rise in the core speed of the GeForce 2 GTS was along the lines of .1 FPS. The largest speed increase seen from 200 MHz to 240 MHz was 1.9% speed increase when at 1600x1200x16, a FPS gain of 1.1 FPS. The average speed gained from this massive 40 MHz overclock was around 1.3%, a speed increase more commonly associated with a 5 MHz or less overclock in the core.
Could we perhaps be experiencing a bottleneck in the system? It seems most likely. Could the bottleneck be in the memory? Let's take a look and see what overclocking the memory did to the performance of our card.
Overclocking: The Memory
In order to determine which aspect of the GeForce 2 GTS is best to overclock, it is necessary to examine how the card reacts to overclocking the memory. The graphs of performance in Quake III Arena demo001 when the memory clock was increase in 5 MHz increments are shown below.
Note: Due to the extremely large amount of data that was collected in this section, it was necessary to place the graphs in a column graph orientation. The graphs do convey the same information as the above section, just in a different format.
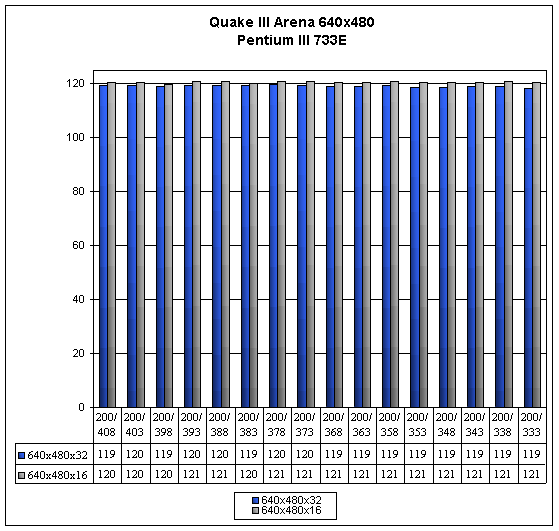
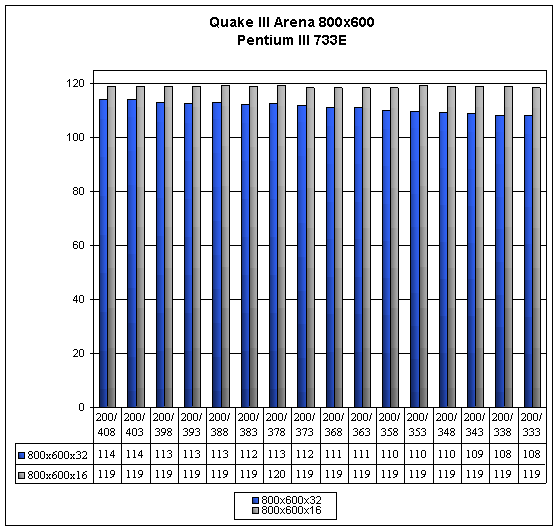
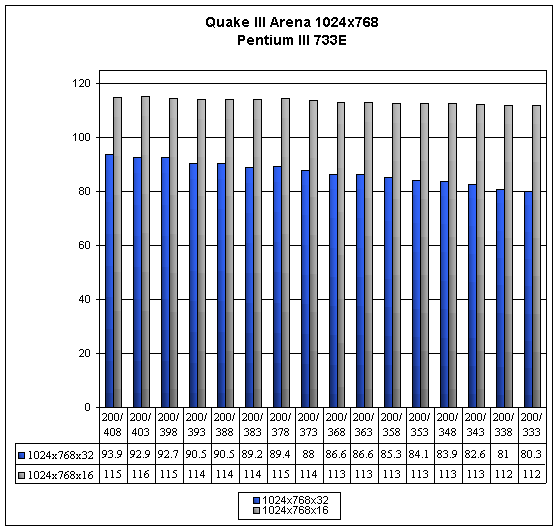
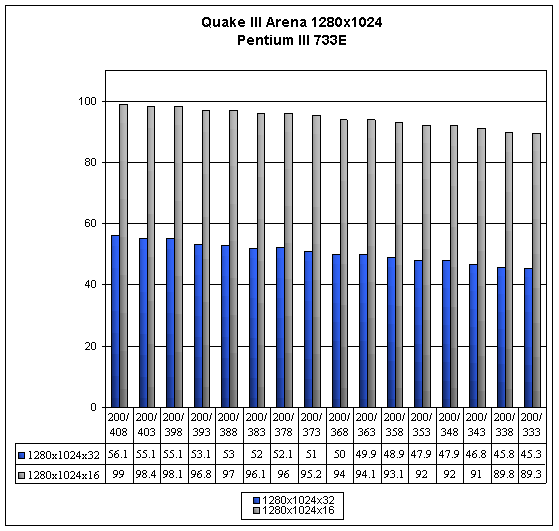
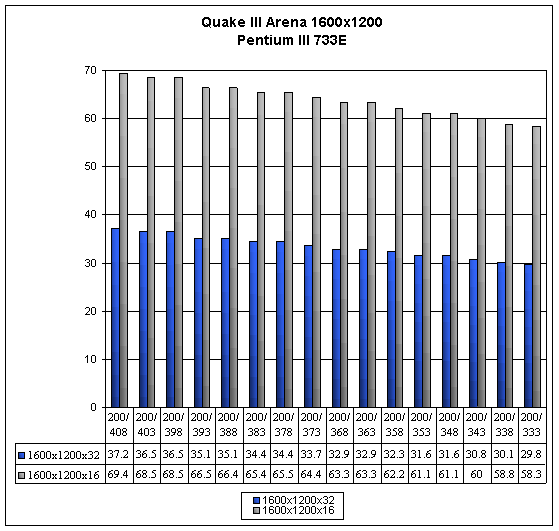
This time it appears that the graphs look as expected them to, with noticeable differences between each 5 MHz increment. Once again we find that variation in values below the resolution of 1024x768x32 provides us with no useful information, however at this resolution and above we find the true key to overclocking the GeForce 2 GTS.
Without overclocking the GPU core at all, we were able to push the memory clock up to 408 MHz, 75 MHz above stock. At this highly overclocked speed, we find that the largest performance difference comes at 1600x1200x32 with a performance increase of 24.8%. No longer do our 5 MHz increments result in .1 FPS gains: we see gains as large as 13.6 FPS when at 1024x768x32.
What does this tell us about the GeForce 2 GTS. Well, it reveals that there is in fact a bottleneck in the system and this bottleneck is the memory bus. The 333 MHz memory clock speed that the GeForce 2 GTS defaults at does not provide enough bandwidth for the GPU to reach its effective fill rate. If this were not the case, and the memory bandwidth was more than adequate for the amount of information it needs to handle, we would have seen large increases in performance when overclocking the GPU and no performance increase when overclocking the memory clock. Since this is exactly opposite to the case at hand, the GeForce 2 GTS must be severely limited by the memory bus bandwidth. Even at the stock core speed of 200 MHz, the memory bus is being saturated by the GPU and as a result overclocking the memory resulted in large performance gains.
Now that we know what an important role the memory clock plays in the GeForce 2 GTS, we must can make a conclusion as to the best way to overclock the video card.
Overclocking: The Core and the Memory
It is customary to overclock both the core and the memory speeds when overclocking a video card. Usually, a user will sit down and overclock both the memory and the core speeds in a linear fashion, say 5 MHz each test. Generally, the card is overclocked to it maximum when increasing the core and memory speeds 5 MHz more results in system failure or artifacts. To simulate this, we performed the same procedure on our test bed computer.
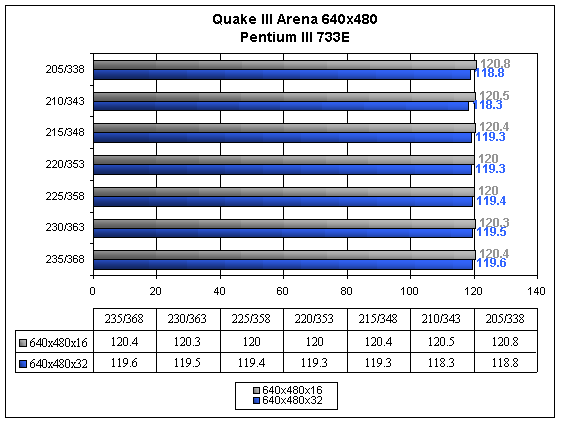
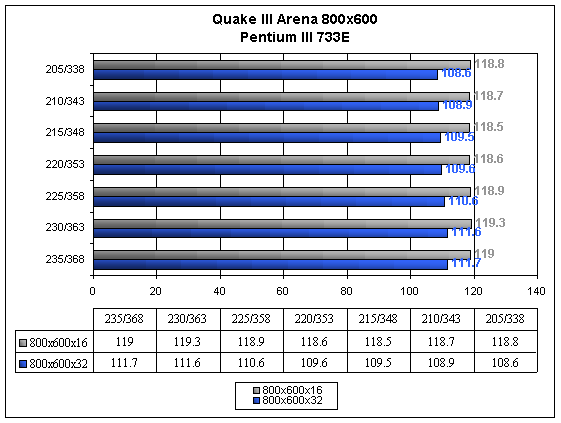
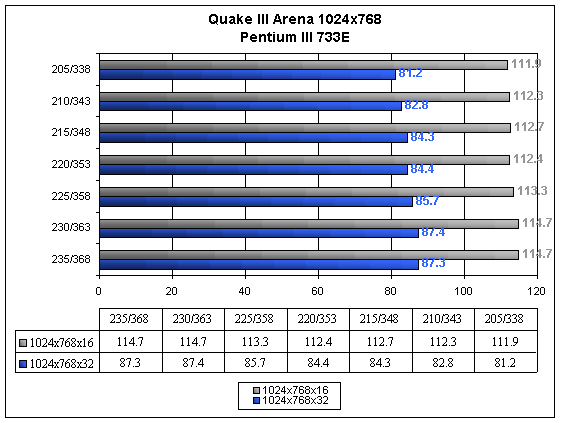
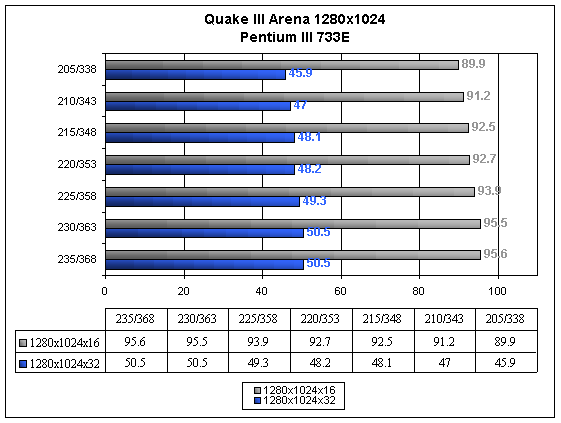
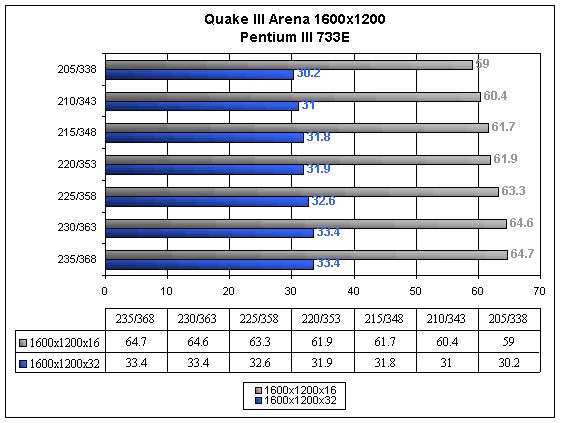
This conventional overclocking method provides for some interesting results. First off, note that the maximum speed able to be reached when both the core and the memory clock are overclocked together is lower than the maximum speed reached when overclocking both components separately. In this case we were able to get the core speed up to 235 MHz and the memory speed up to 368 MHz before stability was lost.
Also note that while speed was gained when overclocking the core and the memory together, 10.5% at 1600x1200x32, the speed gained was not even close to the speed gain experienced by overclocking the memory by itself. The speed gained was significantly greater than the speed resulting from overclocking the core alone, however. This aspect of overclocking will be discussed in the next section and will provide us with a guide as to how to overclock the GeForce 2 GTS.
How to Choose
We have seen the results of overclocking the memory, the core, and both together. Now, how do we analyze this information? Let us examine the graphs of performance in Quake III Arena when 1) the core is overclocked to the max while the memory stays stock, 2) the memory is overclocked to the max while the core stays stock, and 3) both the memory and the core are overclocked to the maximum in a linear fashion. Below is a graph of the performances. Left out are resolutions below 1024x768, as no performance difference can be seen for the most part.
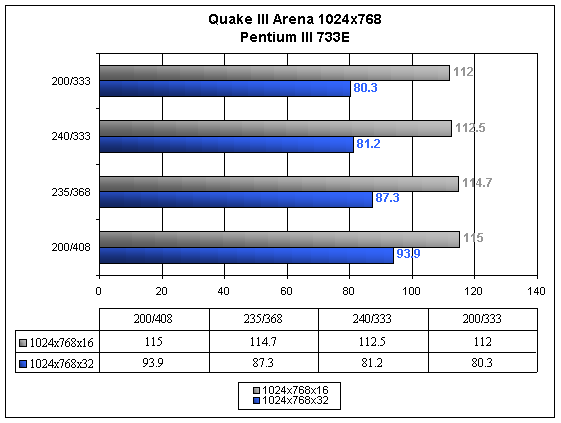
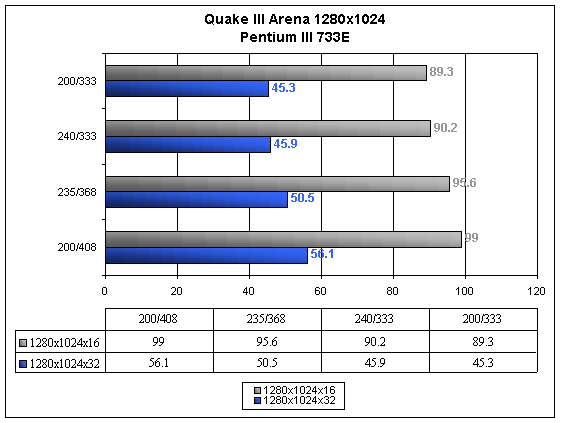
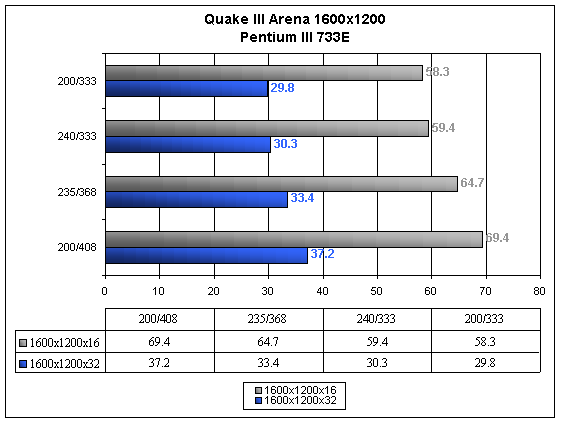
As the above graphs show, the most performance is to be gained by overclocking the memory clock to its maximum. This, in turn, speeds up the slowest part of the video card and allows the GPU to get closer to obtaining its theoretical fill rate.
We were curious to see how far the core could go with the memory clock speed all the way up at its 408 MHz setting. With a bit of experimentation, we found that the card was stable when the core speed was 220 MHz. This resulted in a GeForce 2 GTS card running at 220 MHz core and 408 MHz memory. Below are graphs that show this card in comparison to all the other overclocked options.
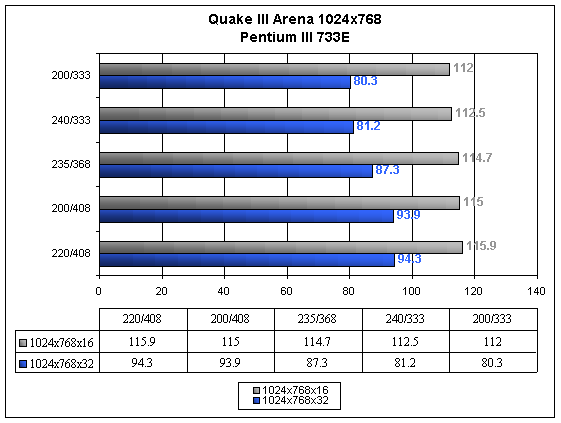
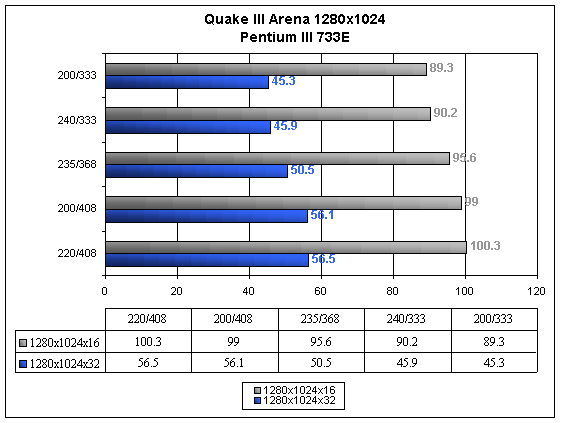
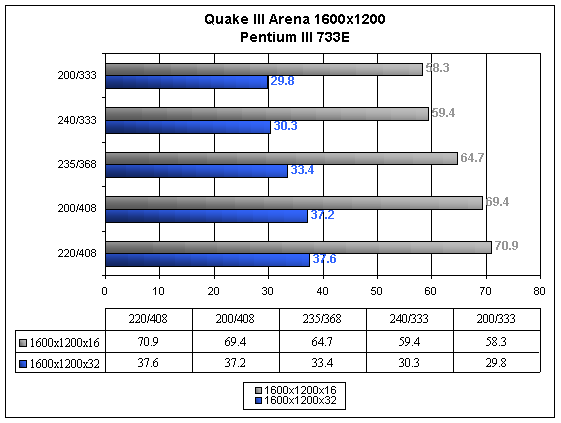
Now we can finally see what the best combination for overclocking a GeForce 2 GTS is. We find that any extra MHz that can be added to the core after the memory clock is running at its full speed are helpful, however provide only slight increases over just overclocking the memory clock. When this technique is used, speed increases as large as 26.2% are to be found at 1600x1200x32 and FPS ratings can jump as much as 14 FPS at the commonly played resolution of 1024x768x32.
Conclusion
It used to be that the goal for overclocking was to get the highest core speed and the fastest memory speed while maintaining stability. This, however, is no longer the case. With the arrival of the GeForce 2 GTS we see the limitations of a slow memory system come into play. Even a few months ago, this was not the case. The DDR GeForce 256 seems to have adequate memory speed to allow the GPU to function at almost full power.
Features such as the the GeForce 2 GTS's ability to process eight textures per clock as well as the card's increased raw speed (MHz) provide for a memory road block to be hit because the memory pipeline simply can not handle the information being thrown to it and requested. Therefore, we see the GPU has speed to spare due to the fact that it is usually waiting on the memory. This fact is displayed by the huge performance increase that occurs when the memory clock is overclocked and the poor performance gain obtained by overclocking the core clock.
The best way to overclock you GeForce 2 GTS? As proved above, you will want to play with the memory clock settings until it is as high as it will go. Next, increase the core speed step by step until the card becomes unstable. Unlike previous cards, we no longer want to get the most out of our core as well: it has become secondary.
The next few months should prove to be interesting. Rumors of 5.5 and 5 ns DDR SGRAM/SDRAM chips coming out are starting to be heard, meaning that the card will operate stock at the high DDR memory speed of 400 MHz (366 MHz in the case of the 5.5 ns chips). However, with all that speed to be gained, what will happen next? Naturally, we will push the new chips to the limit by overclocking in an attempt to produce the fastest card possible. Who knows, maybe if we push enough perhaps we can start to get rid of this nagging memory bottleneck. Only overclocking will tell; for the time being.


